Use the CAGED system to quickly find your way around the fretboard.
The whole idea of using the CAGED method to create guitar solos is a very useful one but is sometimes oversold when you hear it spoken about. If you are new to the CAGED guitar system then stick around because you are about to learn a very useful thing to help with your guitar playing. The only thing is, don’t expect to revolutionise your guitar playing overnight, it’s a great method but it takes some time to get used to it enough before you can use it to it’s full benefit.
Throughout the pages on this site we will be finding ways to use the CAGED method by building our knowledge one step at a time with practical examples including TAB, audio and some practice jam tracks.
The first thing we ned to do is untangle a few myths. You can’t just learn what the caged method is and then start using it to any benefit. Not only does it take time to get used to but you will also need to be familiar with the notes on the fretboard. If you can’t find them easily at least on the fifth and sixth strings then you aren’t going anywhere fast with the CAGED method.
I’m not going to waste time telling you how to find the notes on the fretboard, a quick Google search and you will find thousands of websites with that information. What we will take a look at here is the important part… using the notes on the fretboard to locate the chords we want.
The CAGED diagrams on the main page gives the basic info on the CAGED system and it’s related chords. Here’s how we use the fretboard notes to line up those chords. The red notes are the root notes of each chord. It’s important that you learn these so well that you don’t need to think about them. As you get better at finding the notes on the fretboard you will find it easy to find these chords in any position almost instantly.
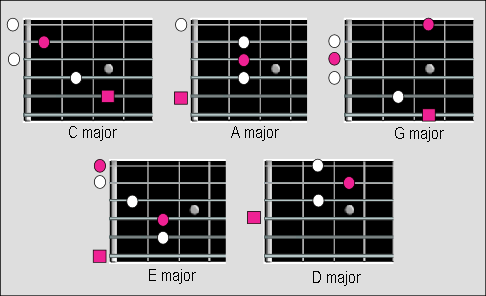
The red notes are the root notes, you must learn them.
Practice these chord positions regularly until you know them inside out and make sure you practice them in all twelve keys, this is extremely important. If you can’t use them in all keys then you are never going to see any benefit from using this method. You might be wondering why learning the chords are so important, after all isn’t the CAGED system supposed to be all about helping you with your guitar solos? Yes it is, however the chord sequence itself is the heart of the system. It’s these chord shapes and positions that you can use as your foundation or your guide to find chord tones, arpeggios and scales anywhere on the fretboard very quickly and that is the heart of creating good guitar solos.
A great guitar solo isn’t just about choosing the right scale, that’s easy to do for most chord progressions. What we are looking for to create professional sounding lead guitar is ways to break out of the scale rut and the systematic use of them. A good guitar solo takes as much notice, possibly even more notice of the chord tones. Scales can be put to good use in a decent guitar lead but, they are often used as the core, the foundation if you like, but the best solo’s have character. They always fit the music perfectly and most of the time this id done by knowing the best notes to use at the best time, which is basically making proper use of chord tones that fit the chord at that moment in the chord progression.
In the next lesson you will learn how to make use of the CAGED chords and patterns to create guitar solos with chord tones instead of scales.
You said:
“Practice these chord positions regularly until you know them inside out and make sure you practice them in all twelve keys, this is extremely important.”
How can I practice them in different keys? I mean, they are just chords… or do you mean the chord progression I use?
nice lesson, i found this to be more concise than some of the other explanations of this theory i have found. it was a great primer for me to practice before todays guitar lesson
This helps me a lot!
I got this on music school and many people tried to explain it to me. But I just didn’t get it. I just read the whole thing and I get it now. You explain it very clearly, thanks!
I play guitar for some time now (6 years), but my past guitar teacher never spoke of this or something that looked like this. It’s a bit of a shame I’m seeing this a bit late after all those years, but I’m glad I can finally improve my playing.
Sorry for sounding a bit dim, when you use these chord positions, in the twelve keys, do you just shift the chord shape up and down the neck for the different keys? E.G The C open chord shape, if I would move that shape up a fret, would that make the chord a C#? Also when using the CAGED system would the same apply, for example staying with the C chord, with the A shape being used to form the C chord on the 5th fret (barre chord on third), if i then move this up a fret this would make it C#?
It’s okay know I think it just dawned on me. Thanks anyway. I love your site, its really useful and not offputting like other sites.
Cheers Viv……….Newbie guitarist.
I meant now in my last comment lol :0
if you want to play them in different keys, the idea is to find the c shape for that key.
the easy way to do this is to start with the E shape (which forms the shape of an open E major chord, and has root notes on 1st 4th and 6th strings).
so if we want to try this whole thing in the key of D major, find the D note on the 6th string (10th fret) and do an E form major chord (the common known movable shape) then spell the rest of caged from there , and remember anything that happens on the 12 fret or after is repeated and can be done starting with on open string,
its important to take note of what chord ends up behind the C shape when you are in the next key, in the key of D the D shape would be played open, then the C shape would be played by barring your finger across the 3rd fret so that it acts like the open strings
so in the key of D
Julio Says :
July 22, 2009 at 11:48 pm
You said:
“Practice these chord positions regularly until you know them inside out and make sure you practice them in all twelve keys, this is extremely important.”
This instruction is poorly worded, since these chords are not diatonic to any one particular key. I would just practice the C-A-G-E-D chord form changes at every fret that is reasonably comfortable and practical. Say the actual note names of the chords as you change.
Exercising the hands / wrists / fingers in this manner can be a bit hazardous. Avoid injury by resting after doing the changes at each fret. If you feel pain stop immediately. Fatigue is acceptable in guitar practice; pain is not.
Its good basic lesson and muchos kudos for putting it up there.
For beginners I’d probably, give them the initial exercise in D.
i.e. (building on marduk gault’s post)
1. Start with open D chord that everyone starts out learning (root 4/2)
See how the D note on the second string (root 2) is the basis of the C form
2. Make ‘C form’ at second fret which is now a D Chord using a ‘C’ form (root 5/2).
See how the D note on the fifth string (root 5) is the basis of the A form.
3. Make ‘A form’ at fifth fret which is now a D Chord using the ‘A’ form (root 5/3).
See how the D note on the third string (root 3) is the basis of the G form.
You should start to see a circular pattern forming (D-C-A-G-E-D) extending the chords up the neck using the previously unused root note as the basis for the next chord form in the sequence.
So to continue…
4. Make ‘G form’ at seventh fret which is now a D Chord using the ‘G’ form (root 6/3).
See how the D note on the sixth string (root 6) is the basis of the E form.
5. Make ‘E form’ at tenth fret which is now a D Chord using the ‘G’ form (root 6/3).
See how the D note on the four string (root 4) is the basis of the original D form only one octave higher.
6. Next do it backwards following (and paying attention to) the root notes.
7. Then repeat for each of open C A G E chords.
8. Apply to the two remaining keys (B&F) which don’t have a chord in the CAGED system.
Otherwise it would be CAGED (BF) which has weird connotations. 🙂
Sorry for sounding a bit dim, when you use these chord positions, in the twelve keys, do you just shift the chord shape up and down the neck for the different keys? E.G The C open chord shape, if I would move that shape up a fret, would that make the chord a C#? Also when using the CAGED system would the same apply, for example staying with the C chord, with the A shape being used to form the C chord on the 5th fret (barre chord on third), if i then move this up a fret this would make it C#?
@Amy
Yes, you’ve got it. Some of the chord shapes are a bit difficult for fingering so if you can’t do just yet then use partial shapes. Obviosly, if you move the C along one fret up to C# then you need to bar the first fret with your forefinger, a bit tricky at first.
What’s probably more important is that you learn to recognise the chords anywhere along the neck, learn the root notes and how the chords overlap. You can still gain a lot just from being able to visualise the chords in all twelve keys.
This is the key to getting full fretboard control.
To me the cords f and b are caged
Out54law – the F chord is based on the E shape, and the B is based on the A.
Julio Says : How can I practice them in different keys? I mean, they are just chords… or do you mean the chord progression I use?
A: What he meant was, take C – major chord for example, and practise it (play it) all over the freat in all shapes, as you know C major chord can be played in all these CAGED shapes. So play C chord in C-shape, C chord in A-shape (that is that Barre on 333333 and 555 on 2nd3rd4th string you know what I mean, then play C in G-shape etc etc, this practise will help you remember the positions of relative Key. Practise these for every chord.
So, this is sort of something you can combine with the major scale modes? (ionian, dorian, phrygian, etc…)
its also good when you are doing this kind of excersize, to spend some time looing in between the chord shapes, and trying to find different triads (just small 3 note chords) this will start to get you really exploring and understanding the fretboard
@motarski: Precise! 🙂
k, i’m confused. what do u mean by ‘the 12 keys’. I understand where you are getting at, I’m just confused about the 12 keys.
For those of you that are confused by the statement, “practice in all 12 keys”, he means that you should play these chords as single note arpeggios, or that you play the notes individually like little scales. So you play it up and then down and then move down a fret and repeat. When you do that you are no longer playing a C chord, but in the case of a one fret move are now playing the chord tones for a C#! So by moving these shapes around you can play a number of different chords, and have their chord tones easily at your disposal. All without having to take the time out to think, “what is the third of a D# chord?”, or whatever other note that you have to think about. All of this allows us to play melodically and smoothly, without a lot of thought. Allowing you to focus more on being “musical”.
thanx schindiddy.the “practice in 12 keys” was confusing.