CAGED Chord Tones Lesson 2

Making use of chord tones

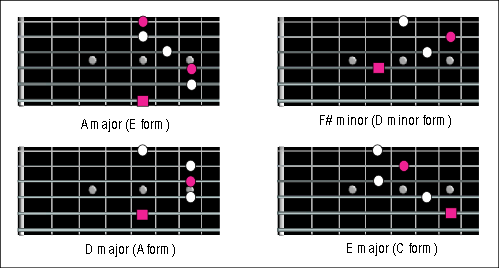
The previous lesson showed you how to find the CAGED chords from a progression without straying too far from the playing position. Getting used to this allows you to easily visualise and locate chord tones. Using these chord tones within your guitar solo will enable you to create lead breaks that always work with the chord progression. Most guitar solos are a mixture of scales, licks and chord tones. The real art is being able to mix these ideas together. The easiset way to accomplish this is to practice the playing the tones only to create a melodic solo. Being able to find these notes with ease is very important and until you can do so, it’s best not to try using them too much with scale playing until they become a natural part of your guitar playing.

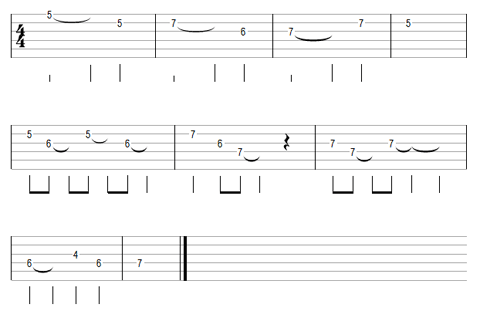
The TAB below shows how you can experiment by creating a simple melodic guitar solo based on the same chord progression as that in Lesson 1. Remember, staying as close to one position as possible is the important thing. The other thing to remember is you don’t need to be using all six strings otherwise it becomes predictable. You also don’t need to play all of the notes within a chord, for example, you could just hold onto one note from a chord for an entire bar and then the next chord change you could play a few more chord tones from the next chord. Breaking it up like this steers it away from being too cheesy. The example below also sounds a bit cheesy but you need to start like this to make sure you are learning properly. As you gain experience these ideas will creep into your natural scale type of soloing and this is when the CAGED method starts being useful. Although I think “method” is the wrong word. It’s better to think of CAGED as being a kind of overlay or guide across the fretboard rather than a system or method. Eventually you won’t even think about CAGED, everything just becomes chord tones and notes.

guitarsolo1.gif 


CAGED Technique Lesson 1

Playing chords in one position

Two of the biggest differences between pro and amateur guitar solos are knowing when to play the right notes at the right time and making those note transitions work smoothly. This is something that you might think would take years to accomplish but it’s not really that hard. Sure it takes some time but the biggest hurdle the beginner guitarist has overcoming this problem is most beginner and amateur guitarists just don’t know how to go about practicing this kind of stuff. Where do you start?

Learning the notes on the fretboard is definitely a big deal and helps your guitar solos massively but a lot of rock and blues use a lot of very common chord progressions. This is the best place to get started on putting the CAGED system to good use and see some real benefits in a short amount of time from the CAGED method.

Knowing the CAGED chords and being able to find them quickly is the easiest way to make use of chord tones in your guitar solos. Once you know these very well then you can use the system to make sure you land on the good sounding notes whenever the chords change in a chord progression. You know those guitar solos you hear that always sound so natural and flowing with the music, those are the ones that make sure the chord changes are reflected within the solo itself as well as the other instruments playing the backing. If a solo is self supporting then it’s always going to fit well within the rest of the band.

Once you have this kind of stuff down then you are on your way. Don’t get too excited though, there is a lot to learn yet, this is just the basics of putting the CAGED guitar system to good use. The toughest part is getting so used to it that you can move to any chord while moving your fretting hand as little as possible away from it’s current position. Why? Because this is how you get your guitar solo to sound so smooth and fit perfectly with the music. If you can manage to choose notes within your guitar solo that change between the chords with the least amount of distance, this is when you start to sound like a real pro. We can’t rush ahead this fast so for now lets just take an example chord progression and look for the CAGED chords that are closest to the position we are playing. For this example lets say we are around the fifth fret and using the following chord sequence.

Chords: A / F# minor / D / E

Here are the CAGED chords around the fifth fret.

chordsequence1.gif

Being able to find those patterns quickly takes some practice and the more you know the notes on the fretboard the better. It really doesn’t take very long to do learn any of these things, here’s a fact, most beginners spend more time looking for answers and tricks on how to learn the fretboard than it actually takes to learn them with the correct practice!

Just do a few exercises everyday, it doesn’t need to be anything in particular.. Just pay attention to what you are playing and practice the above idea in all twelve keys regularly, within a month you’ll be well on your way. Within a few months you could know the entire fretboard with ease as long as you stay focused and make sure you are learning and not just going through the motions. I’ll do an in depth lesson on that another time but right now lets stick with the CAGED system!

For now, all you need to do is practice the above chords in those positions. Don’t worry if you find them difficult to finger, the point is to get to know the note positions and chord patterns. When it comes to creating our guitar solos, we want all of those notes firmly fixed in our minds without any thought required. It’s good if you can play them as full chords but for the sake of what we are learning here, you only need to play the notes. The TAB below will give you the idea. Practice regular for a few days and then you will be ready to move on to the next lesson.

sequence1tab.gif